Paper Quilling
Paper Quilling, also known as Paper Filigree, is the art of
rolling, gluing, and forming strips of paper to create various types of designs.
Although the origins of paper quilling is not known, it was used during the
Renaissance on book covers, furniture, and other religious items.
The art of paper quilling began to spread and became popular in Europe during the 18th century.
Paper quilling was still used to decorate book covers and furniture,
but was now expanding to more everyday items such as tea cubbies.
Paper quilling is an art form still used and practiced nation wide.
They can be sculptural, or completely 3-dimensional, and they can also
be designed as a relief sculpture, with only parts of the art popping out.
Check out the site below for some more information on the history of Paper Quilling
|
|
|
Your Mission:
You will be creating your own paper quill design using 3 or more filigree techniques learned in class
You will need to consider the following before you start your design:
- What do you want to design?
- Do you want your design to be a sculpture or 3-dimensional? ~ Do you want your design to be a relief sculpture?
- What colors are you going to use?
~ Will it be monochromatic? ~ Multicolored?
- Will it blend in with your backing paper? ~ Will it pop due to the contrast?
- Are you putting your creative mark on your design?

Examples of quilling techniques with instructions 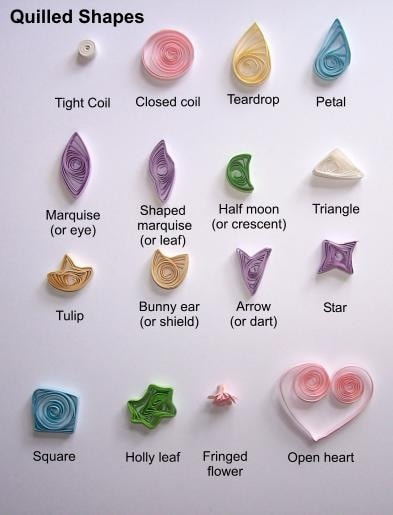
|
Some basic quilling shapes are:
COIL – made simply by wrapping the strip of paper around the quilling tool DIAMOND or EYE SHAPE– After the coil is made, pinch two opposite sides. LEAF – Bend one end of the diamond to form a leaf shape. OVAL – Squeeze a loose coil into an oval shape, but don’t pinch the ends. SQUARE – Roll a loose coil and form a diamond. Pinch the smooth sides into points to form a square. TRIANGLE – Pinch a loose coil into a 3-sided shape. CLOSED HEART – Make a triangle, then push in one side to form an indent at the top. OPEN HEART –Fold the strip of paper in half and roll the ends in toward the center of the crease. “V” SHAPE – Fold the strip in half and roll the ends away from the inner crease. PEACOCK EYE – After a coil is made, pinch only one side. A petal can be formed by bending the tip of the peacock eye slightly to one side. PEG- A peg is simply a tightly rolled coil that is glued to keep it tight. A peg can be used as part of the design, or glued to the underside of another shape to raise it and create dimension. CONTOURED PEG – After rolling a tight coil, push the peg up from beneath to make it into more of a cone shape. This will also add dimension to a design. HALF MOON – Pinch a loose coil on two sides while placing your finger in the middle of one side. TULIP – Pinch a half moon while pushing in towards the center at one side. Rubric
| ||